This is a test post. All will become clear shortly 🙂
Terminology untangled – anchor text and links, or how to make them work for you.
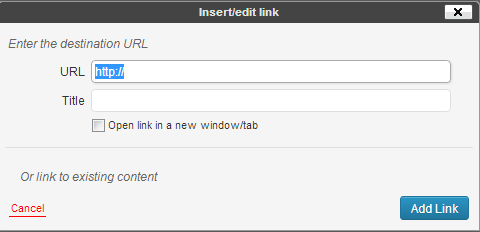
I think we’ve got to a point now, if you’ve made it to this website, where you know what a URL is. (I’m not talking about what it stands for, which is Uniform Resource Locator, but what it is.) It’s that thing you type in the address bar to get to a website – it starts with http:// and includes the domain name and so on. And most people know if they want to add a link in to their post, they need to copy that in. But do you know how to make it look pro? WordPress gives you a tool for it. If you’re in the visual editor it’s right there, looks like this ![]() When you click it you get this little box
When you click it you get this little box 
Now, it’s fairly obvious that you put the place you want to link to in the top slot. But what’s the title all about? Well, that comes up if you mouseover a link. It’s used by some screenreaders, but absolutely shouldn’t be stuffed with SEO stuff, so don’t even go there.
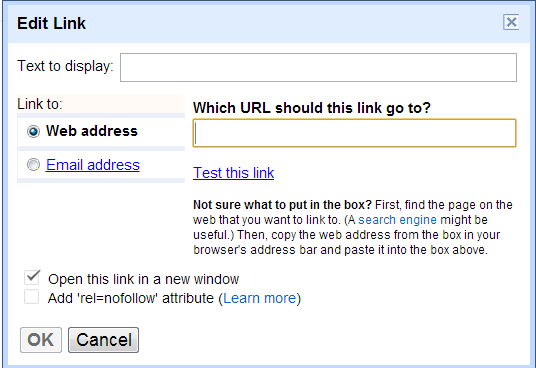
Now you might notice that there’s some text in my paragraph that’s linked there. I did that by selecting the text *before* I clicked the link tool. And the text that is hyperlinked is called the anchor text – it’s information about what the link is going to be about. So, if you want to link to someone’s blog, for example, you might write about Not different but interesting, then select that text, click your link tool, insert the URL and away you go. You’ve got to admit it looks better in the flow of your post than having http://notdifferentbutinteresting.wordpress.com hyperlinked? And it tells the reader (and the search engines) what you think that link is about. Wins all round. Give it a try next time you want to put a link in. (Note blogger has a similar tool. The dialog is a bit better though: 
So it’s got a place to type in the text, makes it plain what you’re putting in linkwise, and even mentions rel=nofollow. If you want to do that on wordpress, you’re going to need a plugin or the text bit of your editor. Let’s cover that, and why you might want to use it, in another post.)
More on G+ – authorship on self hosted wordpress including multi author sites.
Yesterday I wrote about how to claim authorship for your wordpress.com site. The technique I used included displaying a profile badge on your blog. You might not want to do that (perhaps you’d like to display a page badge instead, more on that in another article), or you may have more than one author on your site, like I have on Making it up, so need something a little different.
Don’t worry, this is still straightforward. There are plugins, such as Yoast, that will achieve this for you, or you may be able to do it with your theme, particularly if you’re using a premium theme like Genesis from Studio press, but it’s very simple to do it yourself. Basically, there are two steps.
Step 1 – each author needs to list your blog in the contributing section of their google profile.
So my profile looks like this:
 (as ever, click to embiggen).
Step 2.
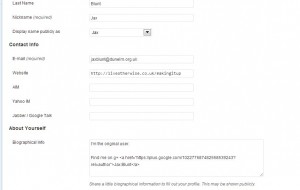
In your wordpress admin, find users on the left hand side. Select, then select yourself. In the biographical info section, you’re going to put your g+ profile link with the rel=”author” tag. So mine looks like this:

And I’ve got code looking like this:
in there.
(If you cut and paste this handy code, do remember to swap out my name and profile number for yours!)
If you’ve only the one author, you’re done. Otherwise, you repeat for each individual author.
You can test that you’ve got it all working fine by using the rich snippet testing tool.
If you have any problems getting this working, do let me know via the comments box, or ping me on twitter or even via g+ 😉
Getting into the g+ groove – google authorship and wordpress.com
There’s a new social network in town, and it’s not going to go away in a hurry. If you’re getting ready to hangout on g+ (see what I did there?) one of the things you should be thinking about is claiming authorship. Don’t know what that is?
Quite simple. If you try checking out the search listings these days, you should see some articles come up with a fetching headshot of the author next to them. Those authors have claimed authorship of that article via google. You can claim authorship across multiple sites, but for today I’m going to concentrate on wordpress.com blogs.
After some experimentation, it seems to me there are two major ways to claim authorship on your site. One is by displaying a badge on your site, which has its own difficulties, given that you can’t use javascript on wordpress.com and the nice tool Google has supplied only seems to build javascript.
Before we go any further, you do have a G+ profile don’t you? You’re going to need one. You can pop off and create one now if you like, I’ll wait.
Right, here’s how to build a nice badge that links to your G+ article. The google tool to do it is here. Even though it says it’s a static tool, it looks to me that it’s building javascript, so that’s not going to do wordpress.com authors any good at all. Fear not, I have a solution. This is the code I’m using on my wordpress.com site, Let’s raise the roof.
You will want to swap out the long number in the link for your own profile number – you don’t really want to be displaying my badge all over the place! But this code should give you a nice badge for your site. I’ve put it in a footer widget as I don’t have a sidebar, but wherever you can that displays it on every page really.
Then you need to go back to your google+ profile and make sure you’ve added the site to the contributing section.
You’ll want to test that it’s all working – google have handily supplied a rich snippet testing tool.
I also have an author tagged link in my about page although I’m not convinced this is completely necessary if you’ve got the badge all over the place. Do let me know if you find differently.
(Again, swap me out for you.)
If all that has worked, it’s probably time for a cup of tea. And maybe a biscuit. Sit back and congratulate yourself.
Now, I’ve every reason to think that this would work fine if your site is self hosted, but what if you don’t want to display a g+ profile badge on every page, or you want to show a page badge, or you have multiple authors? Don’t worry. The article that covers all of those is coming up tomorrow. Stay tuned. (Or even subscribe to the RSS feed so you never miss a thing.)
Terminology untangled: domain names, DNS and hosting.
When you go to set up a website, it can be rather confusing trying to decipher the jargon. People throw around terms like domain names, URL, hosting, DNS, and it can be difficult at best to work out what is what. I think that’s part of the reason people often start with free sites like blogspot and wordpress.com and stay there – because they don’t know what it’s all about, and can be scared to ask.
Fear not. If you’re a teen, my daughter is working her way through it and blogging it for you at Tech for Teens. If your teen years are behind you, I’ll be explaining it here too. Between us we should get you sorted.
A blog held at blogger might be at something like http://myblog.blogspot.co.uk Each bit of that has a meaning. The http refers to the protocol used to transfer data – it’s hypertext transfer protocol. It tells a browser what type of data it’s moving about. myblog is a subdomain, blogspot.co.uk is a domain name – in this case belonging to the .co.uk which should be UK companies.
If you go to buy a domain name you’ll use a registrar, someone like Low Cost Names. (Other registrars are available.) We (human beings) use domain names because they are easy for us to remember – computers actually work in numbers called IP addresses. They are in four blocks of up to three numbers, so something like 123.123.123.123 The bit of software that links the two together is a nameserver – it tells the enquiring computer which IP address to find a domain name at. Somewhere at your registrar you should be able to edit DNS (the domain name system information) – you’ll either put in nameserver values given to you by your hosting company (and the hosting company will have set up the right links), or use the nameservers at the registrar and fill in the IP values – but you’ll need to know what values to put in what records, which is beyond this article I’m afraid.
A hosting company maintains servers (computers) and you rent space on them for your website to sit on, as well as traffic to and from them measured in bandwidth. Your website is made up of files that you put there using ftp or file transfer protocol, maybe with a program like filezilla. Or you might find that the company has a system in the control panel that allows you to push a button and install something like wordpress without having to worry about transferring files, which will make your life easier.
That’s a really quick run down of some of the basic terminology that you need to know about. If it’s raised more questions than it’s answered, feel free to leave a comment and I’ll try to explain it further.
Work smarter – mobilise your domain email with Gmail.
First of all, what do I mean by domain email? I’m talking about email addresses associated with your domain. So maybe spammersgoaway at technology-solved dot co dot uk, as an example. When you’re in business, or even if you’re wanting to look like a slightly more organised blogger, your own domain is a great way to go, and email addresses associated with it look more professional.
However, managing email addresses in lots of different places can be a bit of a headache. If you’re wanting to manage things on the go, you’ll probably want to be doing things on your phone. My Android can manage a pop email account (which is what you often have with a domain – it simply means that the email collects on the server where your hosting is, and then is collected from there by an email program) but then there’s the question of whether I also collect it on my netbook and so on.
Life can start to look a little complicated right then, and that’s what we are all about avoiding.
Why not let gmail take the strain? You can manage up to five pop email accounts via your gmail account, without wandering off into the realms of google apps for business. This also means you get the fantastic spam filtering of gmail, and you can access it from whatever desktop/netbook/phone/tablet takes your fancy.
So, how to do it.
First of all, you will need a gmail account. I’m guessing most of you already have one. At least.
Then you set up your domain email, or get your friendly hosting company to do it for you.
Next, you connect the two. In gmail, go into settings (circle icon thing in top right corner) and then Accounts and Import.
Scroll down to Check mail from other accounts (using POP3) and select add a POP3 email account you own. Put the account into the pop up box, and continue.
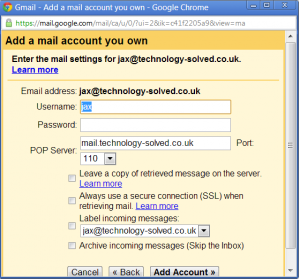
You get to a settings screen that looks like this.
You will need to put in the username of the account – this is usually the email address. Then the password, and the details of the server. If you’ve any confusion here, you need to check with your hosting provider.
If you’re planning on using gmail as your email handler, DON’T tick leave a copy of retrieved messages on the server. If you tick it, you need to make other arrangements to clear down the server, or eventually your mailbox will fill up and you will stop receiving mail.
The google tutorial for this set up is here and if you want to explore the wider world of google apps for managing email, there’s a tutorial over here for that.
The second part of the setup is to organise to send mail from your google interface. This is the Send Mail As setting. Don’t set it as an alias – you don’t need that. (Or read through the help and decide for yourself 🙂 ) And here:
| Reply from the same address the message was sent to |
tick this one as it means the person you’re emailing with won’t ever see your gmail address.
And there you go. You’ve got your domain email all set up and handled through Gmail with no one the wiser, they’re handling your spam and you’re good to go mobile.
