• Skip to primary navigation
  • Skip to main content

Technology Solved

Just another Junction30 Sites site

  • Blogging
  • Gadgets and gizmos
  • Social media.
  • Tweetable definitions.
  • FAQs

Genesis Widgetised Home Page

3rd July 2019 By colneis Leave a Comment

How do I add a widget to the widgetised home page of my website?

Log in to your dashboard, then go to the Home Page.

Select Customise from the top bar

(or in the dashboard Appearance >> Customise)

Select Widgets. You will see a list of the widget areas available. The ones marked Front Page only appear on the home page of the site.

Select the one that you want to work with.

To Remove A Widget

If you want to remove an existing widget click on the small left arrow at its right edge to open its settings, scroll to the bottom of them and click on Remove.

If you wish to edit it make the changes you want and click on done. You can preview your changes in the main screen.

To Add A Widget.

Click on Add Widget
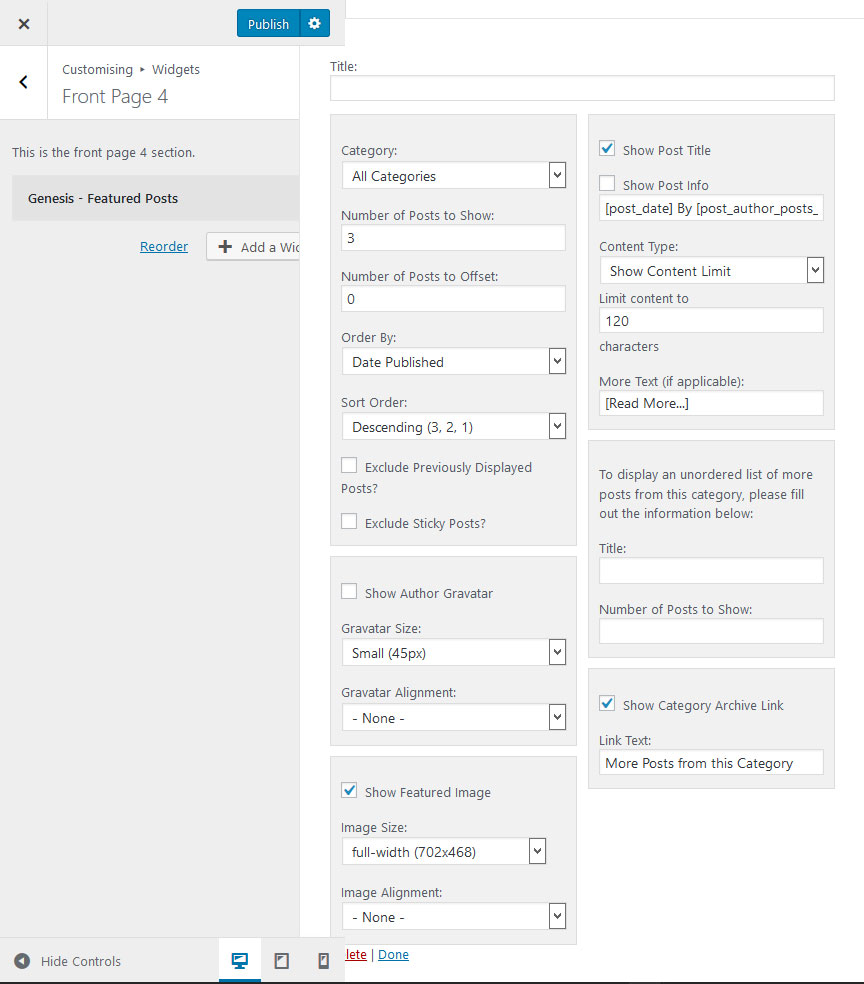
Example: a Genesis Featured Posts widget.
Adjust the settings to suit your needs:

Note:

Some themes require that you add a particular number of posts to achieve a neat layout.

Some use Flexible Widgets styling code and will adapt the layout to suit your choice of number.

In some cases, you may find that posts display in a column on the left of the page. If so you may have to use several separate widgets showing one post each in order for them to display in a row.

All Studiopress Themes have a setup guide which will tell you what layouts will work for your site.

When you have finished, click on Done at the bottom.

Check the home page and if you are happy with it click on Publish. Otherwise go back and adjust your setting, or exit using the X at the very top left.

Filed Under: Uncategorised

Woocommerce – Managing A Product’s Stock

3rd July 2019 By colneis 1 Comment

Could we put a limit on the number of orders we can take for product, is this possible?

This is quite easy to do, go to https://yoursite.com/wp-admin/edit.php?post_type=product (or find it in the dashboard sidebar Products )

Click on Quick Edit.

Check the box:

Set the options:

Enter the number of items you have in stock in the first box, only change the Back-Orders setting from “do not allow” if you want people to be able to continue ordering even when you are out of stock.

You can also find the same options in the main product editor.

Filed Under: Uncategorised

How to make twitter help your blog soar.

19th April 2015 By Jax Blunt 1 Comment

The official Twitter plugin helps you to share your blog using twitter cards to make your links stand out from the card, gives you a follow button and the ability to customise your embedded tweets. Alongside all this, you get access to enhanced twitter analytics, so what are you waiting for?

3 steps to setting up the official twitter plugin on self hosted wordpress.

Install the plugin.

You’ve probably seen twitter cards attached to tweets before now – they’re the ones with summaries or images attached. They stand out from the stream, and give people an idea what they’re clicking through to. The first step to getting all this goodness on your site is installing the plugin. Go to Plugins >Add new and search for twitter. You’re looking for the official plugin. Once you’ve found it, hit install.

[Note, this plugin requires PHP 5.4 or higher. If you’re not sure whether you’ve got that, it’s a question for your hosting provider.]

Setup post formats.

This official plugin uses post formats to decide what card to share with a post. Post formats are theme reliant – if you’ve already got them active, you’re looking for a radio button probably over there on the right, with a list of possible formats as described here. (If you don’t have them visible, the first thing to do is check the screen options (top left) and make sure that you don’t just have the Format option switched off. See the image below for details.)

post formats on wordpress

If Format isn’t in your screen options list though, that means your theme doesn’t support them. Don’t panic, there are still options. For example if you’re using a Genesis theme, you can grab the code snippets from studiopress here and add them to your child theme functions.php. (You’ve got a child theme, right?)

If you’re not on Genesis there’s an informative article here on how to add them to your theme.

Validating your chosen card types.

The other webpage you’re going to need to make friends with is the twitter card validator itself. For each card type you want to use, you need to validate a post with the right markup. This sounds a bit complicated, but it’s as simple as filling in the setup detail in the plugin (basically your twitter handle) and then either editing old posts to be the format you want (from photo and gallery) and submitting the link to the validator. A normal post comes through as a summary card.

For each card, a good picture is a great idea, although a gallery needs 4. Once you have the cards validated against your domain, any time anyone tweets from your site, a card will go along with the tweet, and you’ll get to see all of it in your enhanced analytics (under your twitter profile).

The twitter plugin also offers an enhanced twitter follow button, and tweet button, but to my mind, the cards are the real winner here. Let me know if you get them set up.

Filed Under: Blogging, Social media. Tagged With: gallery, official twitter, photo, post format, twitter cards

Make sure Jetpack G+ publicize settings work for you.

21st April 2014 By Jax Blunt 4 Comments

Just a quick post covering the G+ sharing in Jetpack publicize settings, but it caught me out at the weekend, so I thought I’d share in case anyone else has done the same thing.

When you set up Jetpack publicize you can connect a number of different networks, including Google+. I’d done this for my new photography blog, hosted on wordpress.com. (You find this setting under Settings>Sharing there.) And then I noticed that when the posts were being shared, they were marked private, and were going to a limited audience.

It turned out that when I’d set it up, I’d left it at the default G+ setting, which was My circles, instead of opting for Public.

So in this screen:

jetpack publicise settings

I hadn’t gone into the dropdown alongside where it said my circles and changed it. I disconnected, and reconnected, and this time made sure I went for public.

There can be reasons for sharing just to your circles on G+ but when you’re auto sharing, you probably do want it to go as wide as it can. Plus if a post is shared to circles and someone goes to reshare, they will get a warning about limited audiences, which might put them off. Personally, I’m going for sharing as widely as I can on that auto share, if I want to fine tune, I can do that when I share manually.

Hope that’s a helpful tip for you, if it is, please share it on!

Filed Under: Social media. Tagged With: g+, Jetpack, publicise settings, sharing, wordpress

How to choose a host for your shiny new wordpress website.

15th November 2013 By Jax Blunt 10 Comments

So, you’ve listened to the talks on self hosting your website, you’ve read around on the issues that using wordpress.com or blogger or other free systems might imply and you’ve decided to take the leap.

You know you need a domain name, and a host. But what are those things, where do you get them, and what do they mean?

Domain names

The domain name is the bit that you type at the top of your browser, the person friendly word based address for your website. (A more technical explanation of all of this can be found here.) You buy it from a registrar, and I tend to recommend that you use a registrar separate to your host, because if it all goes pear shaped you don’t want to be trying to transfer domain names as well as all your files. Personally I use lowcostnames – they are reasonably priced, and don’t sting you on renewal.

Then it’s time to look for a host.

Hosting

When you’re just starting out, you don’t need a dedicated server (the machine that all the actual files sit on), shared hosting will be fine. This just means that you are using a server that lots of other people use too, and that you are sharing the IP – there’s some funky software that keeps all the sites separate both in terms of people viewing it, and in terms of you managing it at the back end.

You won’t need a huge amount of storage space to begin with – because you are optimising your pictures for the web before you upload them, aren’t you? And you won’t need a massive amount of bandwidth (this is how the traffic to and from your site is measured) until you’re seeing a reasonable number of visitors.

Personally, I look for CPanel as the hosting interface – it’s well structured and has everything you can need. It also (usually)provides a one click installation for wordpress, meaning that your life stays simple and you don’t have to start installing via ftp (which is not that difficult, but just adds to the stress levels when you’re starting out). Do check that the host you are looking at does provide this though, it has been known for people to turn it off.

Some recommendations (which include affiliate links – please see my affiliate linking policy if you’ve any queries about this):

TSOhost – I haven’t used them personally, but I know a lot of people who have and seem very happy. Use code blogfest to get 10% off (not sure whether that applies to their lowest priced package).

EUKhost – we’ve been recommending these people for around 10 years, and not heard any complaints.

ezpzhosting – we have a server here, and they are excellent.

You can also check out a variety of webhosting review sites – be aware that many of the links on those will be affiliate links as well.

Once you’ve got the domain name and hosting sorted out, and pushed your one click button, the next step will be making your site look pretty – coming soon.

Filed Under: Blogging Tagged With: CPanel, domain names, Hosting, webhost, wordpress

Twitter cards for blogspot users

8th September 2013 By Jax Blunt Leave a Comment

I’ve previously written on implementing twitter cards on wordpress and in a comment on that post was asked if it could be achieved for blogger.

The answer is of course yes, and I found a number of articles claiming to achieve it, but none really seemed straightforward to me, so here’s my own recipe.

(To recap, a twitter card is a tweet with some extra bits on it. Like this one. This is a twitter card set up against a blogspot blog, using the instructions below.)

https://twitter.com/liveotherwise/status/375999874355183616

Header code.

You need to put some code in the header of your template.

I’ve put my snippet right before the closing tag.(click to see bigger)

editing template in blogger

My code looks like this (but without all the <br /> tags which wordpress is helpfully adding).:

Two points
1) Change the @YOURTWITTERNAMEHERE in this code to your own twitter name.
2) This code is relying on you having set a metaDescription on each post. You should be doing that for search engine friendliness reasons (I’m assuming you want to be friendly to search engines anyway.)

If you don’t have this switched on, this twitter card configuration won’t work.

Turning on metaDescriptions

To turn metaDescriptions ON you need to go to Settings> Search description and enable search descriptions.

enable search description

Then when you’re editing, fill it in on the left.

search description

Validate your new twitter card

After you’ve done all this, you’ll want to check that your card validates.

Go to the Twitter card validator on twitter itself and use the try card section. Or if you’re feeling brave, just skip to validate and apply – filling in the url of a post you’ve made that has a description and everything else.

Once you’re happy with how it validates, you have to apply to twitter for the code to actually work – in my experience this takes minutes. There are of course other twitter cards as well as summary cards, you’d have to tweak the code above if you want a different one, if you do that, please do let me know!

Filed Under: Uncategorized

  • Page 1
  • Page 2
  • Page 3
  • Page 4
  • Go to Next Page »

Copyright © 2025 · Genesis Sample On Genesis Framework · WordPress · Log in

  • Home
  • Visiting the blog doctor
  • Privacy and disclosure policies.