• Skip to primary navigation
  • Skip to main content

Technology Solved

Just another Junction30 Sites site

  • Blogging
  • Gadgets and gizmos
  • Social media.
  • Tweetable definitions.
  • FAQs

How to get a new twitter widget to fix that broken tweetstream.

17th June 2013 By Jax Blunt 2 Comments

Twitter API upgrade leads to broken twitter widgets

At the end of last week, Twitter upgraded API from 1.0 to 1.1. (API is how external sites link to twitter’s code.) The result was that lots and lots of tweetstreams on blogs and sites around the internet broke.

It’s likely that if you’re in that situation, you’re hoping that a developer is just going to roll out a fix, you’ll press an upgrade button, and all will be well again. Sadly, that’s not the case. The new design means that you’ve got to create a twitter app to make most plugins work, or your developer may need your twitter login to do it for you.

The twitter widget – a simpler option

There is a simpler option. Remove the plugin/ broken widget, and get yourself a shiny new twitter widget. No log in needed, and all customisable.

Pop over to twitter here and fill in the settings.

create twitter  widget

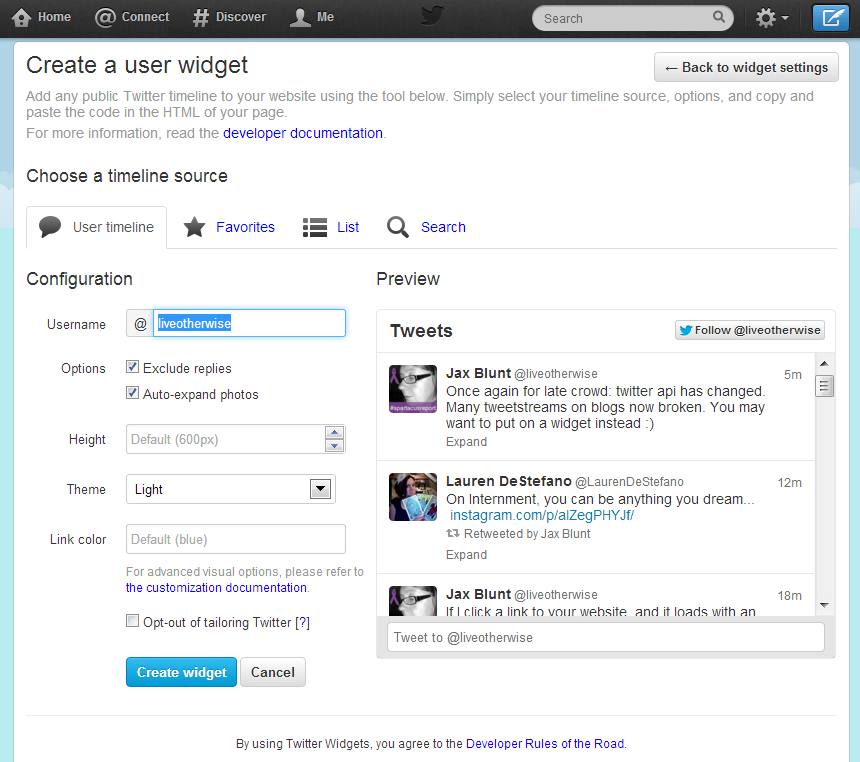
There are some options you can use to customise your code.

The ones you are most likely to want are:

data-theme=”dark” – light! Always light! (The default is light, so if you want light, you don’t need this bit at all.)
data-link-color=”#cc0000″ – probably nice to set this to be the same colour as the navigation links on your site?
data-tweet-limit=”3″ – personally I think 5 is a nice number.

But I don’t want a widget!

For wordpress obviously there are a number of plugins. Some of them, including the one I’ve been using based on the Genesis framework, haven’t been updated yet. The drawback is that even if you use them, you have to create a twitter app, which means going to twitter, and doing set up, and putting in your user details. By the time you’ve done that, you might as well do the widget instead. The widget solution is actually more straightforward, and isn’t affected by rate limits, whereas I think apps are.

What do you do with your widget code? You need to paste it into your sidebar. For wordpress I’ve used a text widget which takes html, and that’s worked fine so far.

As always, do check out the terms and conditions of use of this sort of thing – for example, while embedding a single tweet is fine, it looks to me that a conversation with interspersed comment is not (see Display Requirements, point 6), which makes me wonder how come storify is still running. But there you go. Enjoy your widget!

Filed Under: Uncategorized

Twitter cards – what they are and how to integrate.

15th June 2013 By Jax Blunt 2 Comments

Twitter cards are the latest upgrade to twitter that allows you to add extra information to your tweet when sharing a link. They come in a number of different formats – the one that is most likely to be useful to a business or personal blog is the summary card, which adds a headline, excerpt and pic. Big platforms like wordpress.com have already implemented cards for their users – but it’s easy to do if you’re self hosted as well.

Still not sure what they are? Here’s an example – my first tweeted article from technology solved that includes a twitter card.

https://twitter.com/liveotherwise/status/345925038886748160

The card gives you that extra bit under the 140 characters, and hopefully makes your tweet that little bit more enticing to encourage click through. You’ve probably seen them on twitter from newspaper articles at the very least.

As you might imagine, there are a number of different ways to implement them for your site. Yoast’s WordPress SEO has a twitter section under social if you’re using it, or you can go for a standalone plugin that just does the card integration, which is what I’ve opted for this time, using Twitter Cards.

The plugin doesn’t require any set up, but you do then go to validate it at twitter itself. I was a bit dismayed once I’d filled in all the fields to get a message saying I’d get feedback in a few weeks – but being the impatient sort, I tested it anyway, and it worked fine.

Big hint: twitter cards apply to individual articles, *not* to your home page. If you look for the markup in your homepage you won’t find it, and if you try to validate your home page it will fail. Work from a post within your site. (There, I’ve just saved you the ten minutes I wasted doing it wrong earlier!) Also, it seems that short link tweets from the jetpack publicise don’t get the card associated with them, possibly because it’s not showing the validated domain?

And that’s about all there is to it. So off you pop and give it a whirl, and let me know how you get on. If you found this article useful, don’t forget to follow the blog either via email or on G+.

Filed Under: Blogging, Social media. Tagged With: plugins, publicise, twitter cards

The absolute basics of SEO.

8th June 2013 By Jax Blunt 1 Comment

basics of SEO wordcloud

There’s an awful lot of nonsense spouted about search engine optimisation, as if it’s a difficult topic. It’s not. Here are the basics of SEO as I see them. Your mileage may vary.

A post should be 300-500 words. Good content is written for people, but works for search engines too. A good post summarises the topic in the title, and in the first paragraph, talks about in the main text and summarises in the final paragraph. It’s the tell them three times principle – tell them what you’re going to tell them, tell them, tell them what you told them.

Stick to the point – don’t wander or go off topic. This gives you naturally keyword rich text. (If you’ve got something else to talk about, write another article!)

Use a good platform, like wordpress, which lays the article out well for you. You can use a plugin like wordpress seo from yoast, which will check your text for you and make sure you’ve got the words you need in the right places. WordPress also promotes good site navigation, allowing your readers, and visiting spiders to find all your content easily.

Lift relevant content into your current article by deep linking to related articles. This promotes your authority as having a bank of material on your topic.

And after that, it’s about the promotion, which is where the social media and social search is increasingly coming in. You need to set up authorship, so that search results have that smiling face in them. Brands/ businesses probably also ought to have a page, (facebook and g+) so that they can have a unified presence, but authorship is about individuals.

There’s also something possibly coming in about author rank, which is about authority of that author, but that’s not confirmed yet, so may or may not be worth worrying about. If you’re doing content building and authorship well, author rank should flow naturally out of it.

People will tell you it’s all about the backlinks. Once upon a time that might have been the case, though that can be argued. It’s increasingly less so. Good content will promote inlinks and sharing, which will do the same thing anyway.

So there you go. The basics of SEO coming down, as always to good content, presented well.

Filed Under: Blogging, Business hints and tips

CSS Tip: Absolute Positioning Inside Relative Positioning

23rd May 2013 By colneis Leave a Comment

I was having a little problem with styling a WordPress/Genesis Author Box. The normal layout is that there is an avatar in the top left hand corner around which the text flows- like this:

author-box-1

However, what the client wanted was for the all text to be indented, in a neat column to the right of the image, like this:

author-box-2

Now, my first reaction was that I would need to edit the code which generates the author box, so that the image was wrapped in a block level element, which would then push the text across as required… or something like that. That is a fairly complicated thing to do requiring edits to functions.php and completely disproportionate to what is a pretty minor layout change. I braced myself for the labours ahead.

Then I came across a short article called Absolute Positioning Inside Relative Positioning at CSS Tricks. As the article says – “To some, this is obvious. To others, this may be one of those CSS “Ah-ha!” Moments.” It was for me – I didn’t know you could do that!

The point is as the article says “A page element with relative positioning gives you the control to absolutely position children elements inside of it.”

In my case, restyling the author box took just a couple of minutes and two lines of CSS:

.author-box div {position:relative;margin-left:90px}
.author-box img {position:absolute;left:-90px}

The first line moves all the box contents 90px to the right, the second moves just the image 90px to the left. All done!

Filed Under: Uncategorized

How to improve your page load speed using pingdom.

29th April 2013 By Jax Blunt Leave a Comment

Why would you check your page load speed in the first place?

If you’re like me, you hate hanging around waiting for a page to load. So have you considered checking how speedy your own blog is? There are some simple tests you can do to check what’s going on – one resource I’ve used is called pingdom, and it highlighted a quick and easy fix I could do that improved my page load time.

I tested my lovely personal blog Making it up – it’s quite a busy site and so I think it’s important that’s it’s reactive.

First test result

Speed test result 1
Speed test result 1

Not bad, but I might be able to do better. So I check through the results and find a warning.

missingfiledetails

Take action

I’ve got a missing file – icon-dot.png. And as it’s called from my theme it’s going to affect every page on my site. Not good. Very easy to fix though – I go and look for it and put it back where it should be.

And retest.

speedtest2I’ve gone up two percent against the rest of the test base. Dropped my load time from 2.51s to 2.36s. Not a huge improvement, but if you’ve more than one problem you could easily get a much more exciting result.

Just to confirm:

filedetails

That’s the miscreant file, returned to its proper position. You can see its little load bar is looking much better.

Pingdom is a great tool for testing out the page load speed of your website – and often you can find little problems, easy to fix, that will make a big difference.

(To be fair, I’d already done a variety of other interesting improvements to help with load time, but I’m letting them bed down properly before I write them up. You’ll probably want to check back to see how I get on – why not subscribe to my RSS?)


Filed Under: Blogging

WordPress under attack – how to protect your site from the admin account hack.

14th April 2013 By Jax Blunt 8 Comments

There’s an Ars Technica article flying around right now about a massive attack on wordpress sites around the internet attempting to build a super botnet. The attack is working by targeting a particular user account that the vast majority of sites have, including this one.

According to CloudFlare’s Prince, the distributed attacks are attempting to brute force the administrative portals of WordPress servers, employing the username “admin” and 1,000 or so common passwords.

User access to wordpress relies on knowing three things. A user id, a password, and a login location. This attack is assuming that there will be an administrator account with the user id admin, and is then firing a brute force attack trying to decode the password. Advice to change your password is not necessarily going to help – it might be that your password of choice is one of the 1000 common ones being used as mentioned above. If you go for a long password with a mixture of letters, number and characters you’re going to be much safer. But if you get rid of the account called admin, you’re going to be immune to this particular attack at least.

First thing to do, check if you’ve got an admin account. Go into your dashboard, select users> all users. You should see something a bit like this. (As ever, click to see it larger.)

user panel wordpress

As you can see, I do indeed have an admin account. It will have a strong password – we have a rule that passwords must be at least 8 characters with a mix of numbers, letters and characters. But I’ve decided we’re going to get rid of it anyway.

Step one – create a new administrator level account. If you’ve only got one email address to play with, you’re going to have to take it out of the existing admin account before you can create the new one. Make sure you give the new account a strong password that you can remember.

Step two – log in with the new account. Delete the existing admin account. You might be worrying about what will happen to posts associated with that account – don’t. You’ll get this dialog up with the choice of who to attribute them to. Pass them to your new user.

deleteusersdialog

And there you go. You now have a wordpress installation without the admin account currently under attack across the internet.

Of course, that’s nowhere near the only thing you can do to protect your beloved blog/website, but it’s an excellent starting point. If you want to go into more detail, you might want to explore a security plugin like this one which will, among other things, allow you to rename the admin account without going through the process I’ve detailed here. And the other thing that’s important to do is keep your theme and plugins updated. Like I’m just about to.

If you’ve found this article helpful, please feel free to share it, and subscribe to my blog. Thanks for dropping by.

Filed Under: Blogging, Newsflash Tagged With: admin account hack, security, wordpress

  • « Go to Previous Page
  • Page 1
  • Page 2
  • Page 3
  • Page 4
  • Go to Next Page »

Copyright © 2025 · Genesis Sample On Genesis Framework · WordPress · Log in

  • Home
  • Visiting the blog doctor
  • Privacy and disclosure policies.