• Skip to primary navigation
  • Skip to main content

Technology Solved

Just another Junction30 Sites site

  • Blogging
  • Gadgets and gizmos
  • Social media.
  • Tweetable definitions.
  • FAQs

Uncategorized

Twitter cards for blogspot users

8th September 2013 By Jax Blunt Leave a Comment

I’ve previously written on implementing twitter cards on wordpress and in a comment on that post was asked if it could be achieved for blogger.

The answer is of course yes, and I found a number of articles claiming to achieve it, but none really seemed straightforward to me, so here’s my own recipe.

(To recap, a twitter card is a tweet with some extra bits on it. Like this one. This is a twitter card set up against a blogspot blog, using the instructions below.)

https://twitter.com/liveotherwise/status/375999874355183616

Header code.

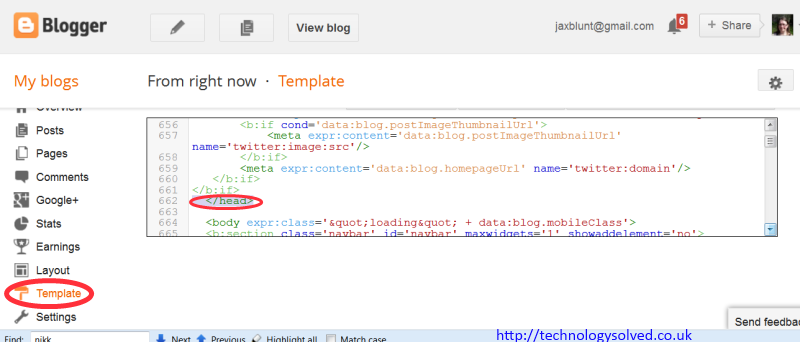
You need to put some code in the header of your template.

I’ve put my snippet right before the closing tag.(click to see bigger)

editing template in blogger

My code looks like this (but without all the <br /> tags which wordpress is helpfully adding).:

Two points
1) Change the @YOURTWITTERNAMEHERE in this code to your own twitter name.
2) This code is relying on you having set a metaDescription on each post. You should be doing that for search engine friendliness reasons (I’m assuming you want to be friendly to search engines anyway.)

If you don’t have this switched on, this twitter card configuration won’t work.

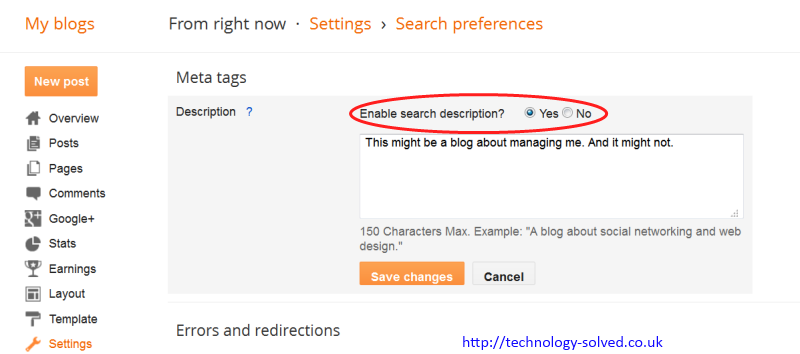
Turning on metaDescriptions

To turn metaDescriptions ON you need to go to Settings> Search description and enable search descriptions.

enable search description

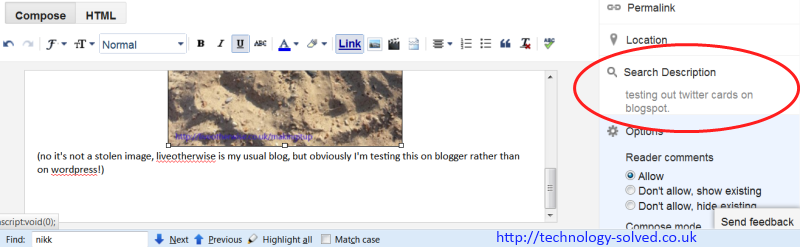
Then when you’re editing, fill it in on the left.

search description

Validate your new twitter card

After you’ve done all this, you’ll want to check that your card validates.

Go to the Twitter card validator on twitter itself and use the try card section. Or if you’re feeling brave, just skip to validate and apply – filling in the url of a post you’ve made that has a description and everything else.

Once you’re happy with how it validates, you have to apply to twitter for the code to actually work – in my experience this takes minutes. There are of course other twitter cards as well as summary cards, you’d have to tweak the code above if you want a different one, if you do that, please do let me know!

Filed Under: Uncategorized

How to get a new twitter widget to fix that broken tweetstream.

17th June 2013 By Jax Blunt 2 Comments

Twitter API upgrade leads to broken twitter widgets

At the end of last week, Twitter upgraded API from 1.0 to 1.1. (API is how external sites link to twitter’s code.) The result was that lots and lots of tweetstreams on blogs and sites around the internet broke.

It’s likely that if you’re in that situation, you’re hoping that a developer is just going to roll out a fix, you’ll press an upgrade button, and all will be well again. Sadly, that’s not the case. The new design means that you’ve got to create a twitter app to make most plugins work, or your developer may need your twitter login to do it for you.

The twitter widget – a simpler option

There is a simpler option. Remove the plugin/ broken widget, and get yourself a shiny new twitter widget. No log in needed, and all customisable.

Pop over to twitter here and fill in the settings.

create twitter  widget

There are some options you can use to customise your code.

The ones you are most likely to want are:

data-theme=”dark” – light! Always light! (The default is light, so if you want light, you don’t need this bit at all.)
data-link-color=”#cc0000″ – probably nice to set this to be the same colour as the navigation links on your site?
data-tweet-limit=”3″ – personally I think 5 is a nice number.

But I don’t want a widget!

For wordpress obviously there are a number of plugins. Some of them, including the one I’ve been using based on the Genesis framework, haven’t been updated yet. The drawback is that even if you use them, you have to create a twitter app, which means going to twitter, and doing set up, and putting in your user details. By the time you’ve done that, you might as well do the widget instead. The widget solution is actually more straightforward, and isn’t affected by rate limits, whereas I think apps are.

What do you do with your widget code? You need to paste it into your sidebar. For wordpress I’ve used a text widget which takes html, and that’s worked fine so far.

As always, do check out the terms and conditions of use of this sort of thing – for example, while embedding a single tweet is fine, it looks to me that a conversation with interspersed comment is not (see Display Requirements, point 6), which makes me wonder how come storify is still running. But there you go. Enjoy your widget!

Filed Under: Uncategorized

CSS Tip: Absolute Positioning Inside Relative Positioning

23rd May 2013 By colneis Leave a Comment

I was having a little problem with styling a WordPress/Genesis Author Box. The normal layout is that there is an avatar in the top left hand corner around which the text flows- like this:

author-box-1

However, what the client wanted was for the all text to be indented, in a neat column to the right of the image, like this:

author-box-2

Now, my first reaction was that I would need to edit the code which generates the author box, so that the image was wrapped in a block level element, which would then push the text across as required… or something like that. That is a fairly complicated thing to do requiring edits to functions.php and completely disproportionate to what is a pretty minor layout change. I braced myself for the labours ahead.

Then I came across a short article called Absolute Positioning Inside Relative Positioning at CSS Tricks. As the article says – “To some, this is obvious. To others, this may be one of those CSS “Ah-ha!” Moments.” It was for me – I didn’t know you could do that!

The point is as the article says “A page element with relative positioning gives you the control to absolutely position children elements inside of it.”

In my case, restyling the author box took just a couple of minutes and two lines of CSS:

.author-box div {position:relative;margin-left:90px}
.author-box img {position:absolute;left:-90px}

The first line moves all the box contents 90px to the right, the second moves just the image 90px to the left. All done!

Filed Under: Uncategorized

sneak preview

14th April 2013 By Jax Blunt Leave a Comment

This is a test post. All will become clear shortly 🙂

Filed Under: Uncategorized

Terminology untangled – anchor text and links, or how to make them work for you.

16th February 2013 By Jax Blunt Leave a Comment

I think we’ve got to a point now, if you’ve made it to this website, where you know what a URL is. (I’m not talking about what it stands for, which is Uniform Resource Locator, but what it is.) It’s that thing you type in the address bar to get to a website – it starts with http:// and includes the domain name and so on. And most people know if they want to add a link in to their post, they need to copy that in. But do you know how to make it look pro? WordPress gives you a tool for it. If you’re in the visual editor it’s right there, looks like this linkicon     When you click it you get this little box linkinsertbox

Now, it’s fairly obvious that you put the place you want to link to in the top slot. But what’s the title all about? Well, that comes up if you mouseover a link. It’s used by some screenreaders, but absolutely shouldn’t be stuffed with SEO stuff, so don’t even go there.

Now you might notice that there’s some text in my paragraph that’s linked there. I did that by selecting the text *before* I clicked the link tool. And the text that is hyperlinked is called the anchor text – it’s information about what the link is going to be about. So, if you want to link to someone’s blog, for example, you might write about Not different but interesting, then select that text, click your link tool, insert the URL and away you go. You’ve got to admit it looks better in the flow of your post than having http://notdifferentbutinteresting.wordpress.com hyperlinked? And it tells the reader (and the search engines) what you think that link is about. Wins all round. Give it a try next time you want to put a link in. (Note blogger has a similar tool. The dialog is a bit better though: bloggerlinkdialog

So it’s got a place to type in the text, makes it plain what you’re putting in linkwise, and even mentions rel=nofollow. If you want to do that on wordpress, you’re going to need a plugin or the text bit of your editor. Let’s cover that, and why you might want to use it, in another post.)

Filed Under: Uncategorized

Terminology untangled: domain names, DNS and hosting.

11th December 2012 By Jax Blunt 2 Comments

When you go to set up a website, it can be rather confusing trying to decipher the jargon. People throw around terms like domain names, URL, hosting, DNS, and it can be difficult at best to work out what is what. I think that’s part of the reason people often start with free sites like blogspot and wordpress.com and stay there – because they don’t know what it’s all about, and can be scared to ask.

Fear not. If you’re a teen, my daughter is working her way through it and blogging it for you at Tech for Teens. If your teen years are behind you, I’ll be explaining it here too. Between us we should get you sorted.

A blog held at blogger might be at something like http://myblog.blogspot.co.uk Each bit of that has a meaning. The http refers to the protocol used to transfer data – it’s hypertext transfer protocol. It tells a browser what type of data it’s moving about. myblog is a subdomain, blogspot.co.uk is a domain name – in this case belonging to the .co.uk which should be UK companies.

If you go to buy a domain name you’ll use a registrar, someone like Low Cost Names. (Other registrars are available.) We (human beings) use domain names because they are easy for us to remember – computers actually work in numbers called IP addresses. They are in four blocks of up to three numbers, so something like 123.123.123.123 The bit of software that links the two together is a nameserver – it tells the enquiring computer which IP address to find a domain name at. Somewhere at your registrar you should be able to edit DNS (the domain name system information) – you’ll either put in nameserver values given to you by your hosting company (and the hosting company will have set up the right links), or use the nameservers at the registrar and fill in the IP values – but you’ll need to know what values to put in what records, which is beyond this article I’m afraid.

A hosting company maintains servers (computers) and you rent space on them for your website to sit on, as well as traffic to and from them measured in bandwidth. Your website is made up of files that you put there using ftp or file transfer protocol, maybe with a program like filezilla. Or you might find that the company has a system in the control panel that allows you to push a button and install something like wordpress without having to worry about transferring files, which will make your life easier.

That’s a really quick run down of some of the basic terminology that you need to know about. If it’s raised more questions than it’s answered, feel free to leave a comment and I’ll try to explain it further.


Filed Under: Uncategorized

Copyright © 2025 · Genesis Sample On Genesis Framework · WordPress · Log in

  • Home
  • Visiting the blog doctor
  • Privacy and disclosure policies.