• Skip to primary navigation
  • Skip to main content

Technology Solved

Just another Junction30 Sites site

  • Blogging
  • Gadgets and gizmos
  • Social media.
  • Tweetable definitions.
  • FAQs

Social media.

How to make twitter help your blog soar.

19th April 2015 By Jax Blunt 1 Comment

The official Twitter plugin helps you to share your blog using twitter cards to make your links stand out from the card, gives you a follow button and the ability to customise your embedded tweets. Alongside all this, you get access to enhanced twitter analytics, so what are you waiting for?

3 steps to setting up the official twitter plugin on self hosted wordpress.

Install the plugin.

You’ve probably seen twitter cards attached to tweets before now – they’re the ones with summaries or images attached. They stand out from the stream, and give people an idea what they’re clicking through to. The first step to getting all this goodness on your site is installing the plugin. Go to Plugins >Add new and search for twitter. You’re looking for the official plugin. Once you’ve found it, hit install.

[Note, this plugin requires PHP 5.4 or higher. If you’re not sure whether you’ve got that, it’s a question for your hosting provider.]

Setup post formats.

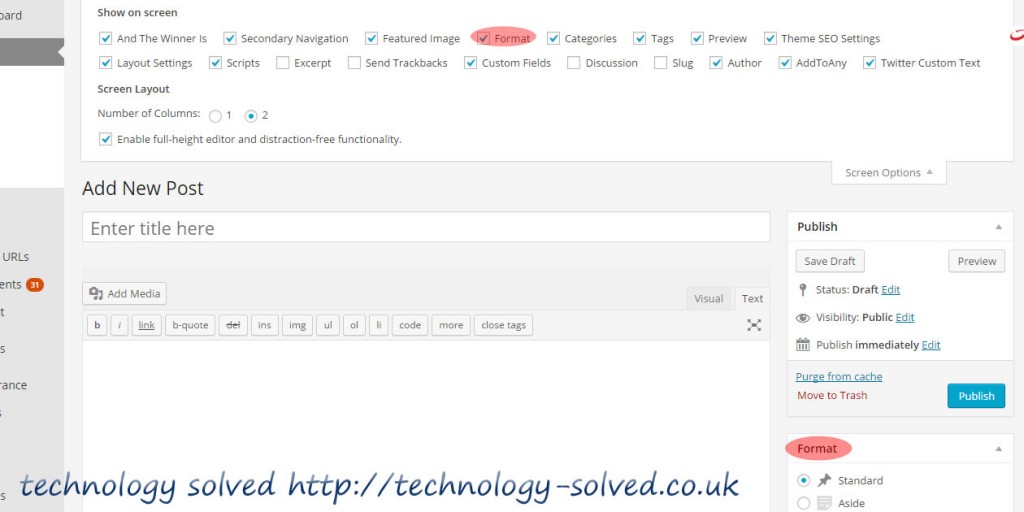
This official plugin uses post formats to decide what card to share with a post. Post formats are theme reliant – if you’ve already got them active, you’re looking for a radio button probably over there on the right, with a list of possible formats as described here. (If you don’t have them visible, the first thing to do is check the screen options (top left) and make sure that you don’t just have the Format option switched off. See the image below for details.)

post formats on wordpress

If Format isn’t in your screen options list though, that means your theme doesn’t support them. Don’t panic, there are still options. For example if you’re using a Genesis theme, you can grab the code snippets from studiopress here and add them to your child theme functions.php. (You’ve got a child theme, right?)

If you’re not on Genesis there’s an informative article here on how to add them to your theme.

Validating your chosen card types.

The other webpage you’re going to need to make friends with is the twitter card validator itself. For each card type you want to use, you need to validate a post with the right markup. This sounds a bit complicated, but it’s as simple as filling in the setup detail in the plugin (basically your twitter handle) and then either editing old posts to be the format you want (from photo and gallery) and submitting the link to the validator. A normal post comes through as a summary card.

For each card, a good picture is a great idea, although a gallery needs 4. Once you have the cards validated against your domain, any time anyone tweets from your site, a card will go along with the tweet, and you’ll get to see all of it in your enhanced analytics (under your twitter profile).

The twitter plugin also offers an enhanced twitter follow button, and tweet button, but to my mind, the cards are the real winner here. Let me know if you get them set up.

Filed Under: Blogging, Social media. Tagged With: gallery, official twitter, photo, post format, twitter cards

Make sure Jetpack G+ publicize settings work for you.

21st April 2014 By Jax Blunt 4 Comments

Just a quick post covering the G+ sharing in Jetpack publicize settings, but it caught me out at the weekend, so I thought I’d share in case anyone else has done the same thing.

When you set up Jetpack publicize you can connect a number of different networks, including Google+. I’d done this for my new photography blog, hosted on wordpress.com. (You find this setting under Settings>Sharing there.) And then I noticed that when the posts were being shared, they were marked private, and were going to a limited audience.

It turned out that when I’d set it up, I’d left it at the default G+ setting, which was My circles, instead of opting for Public.

So in this screen:

jetpack publicise settings

I hadn’t gone into the dropdown alongside where it said my circles and changed it. I disconnected, and reconnected, and this time made sure I went for public.

There can be reasons for sharing just to your circles on G+ but when you’re auto sharing, you probably do want it to go as wide as it can. Plus if a post is shared to circles and someone goes to reshare, they will get a warning about limited audiences, which might put them off. Personally, I’m going for sharing as widely as I can on that auto share, if I want to fine tune, I can do that when I share manually.

Hope that’s a helpful tip for you, if it is, please share it on!

Filed Under: Social media. Tagged With: g+, Jetpack, publicise settings, sharing, wordpress

Twitter cards – what they are and how to integrate.

15th June 2013 By Jax Blunt 2 Comments

Twitter cards are the latest upgrade to twitter that allows you to add extra information to your tweet when sharing a link. They come in a number of different formats – the one that is most likely to be useful to a business or personal blog is the summary card, which adds a headline, excerpt and pic. Big platforms like wordpress.com have already implemented cards for their users – but it’s easy to do if you’re self hosted as well.

Still not sure what they are? Here’s an example – my first tweeted article from technology solved that includes a twitter card.

https://twitter.com/liveotherwise/status/345925038886748160

The card gives you that extra bit under the 140 characters, and hopefully makes your tweet that little bit more enticing to encourage click through. You’ve probably seen them on twitter from newspaper articles at the very least.

As you might imagine, there are a number of different ways to implement them for your site. Yoast’s WordPress SEO has a twitter section under social if you’re using it, or you can go for a standalone plugin that just does the card integration, which is what I’ve opted for this time, using Twitter Cards.

The plugin doesn’t require any set up, but you do then go to validate it at twitter itself. I was a bit dismayed once I’d filled in all the fields to get a message saying I’d get feedback in a few weeks – but being the impatient sort, I tested it anyway, and it worked fine.

Big hint: twitter cards apply to individual articles, *not* to your home page. If you look for the markup in your homepage you won’t find it, and if you try to validate your home page it will fail. Work from a post within your site. (There, I’ve just saved you the ten minutes I wasted doing it wrong earlier!) Also, it seems that short link tweets from the jetpack publicise don’t get the card associated with them, possibly because it’s not showing the validated domain?

And that’s about all there is to it. So off you pop and give it a whirl, and let me know how you get on. If you found this article useful, don’t forget to follow the blog either via email or on G+.

Filed Under: Blogging, Social media. Tagged With: plugins, publicise, twitter cards

More on G+ – authorship on self hosted wordpress including multi author sites.

7th February 2013 By Jax Blunt 4 Comments

Yesterday I wrote about how to claim authorship for your wordpress.com site. The technique I used included displaying a profile badge on your blog. You might not want to do that (perhaps you’d like to display a page badge instead, more on that in another article), or you may have more than one author on your site, like I have on Making it up, so need something a little different.

Don’t worry, this is still straightforward. There are plugins, such as Yoast, that will achieve this for you, or you may be able to do it with your theme, particularly if you’re using a premium theme like Genesis from Studio press, but it’s very simple to do it yourself. Basically, there are two steps.

Step 1 – each author needs to list your blog in the contributing section of their google profile.

So my profile looks like this:
g+ profile showing contributing sites (as ever, click to embiggen).

Step 2.
In your wordpress admin, find users on the left hand side. Select, then select yourself. In the biographical info section, you’re going to put your g+ profile link with the rel=”author” tag. So mine looks like this:
wordpress user info showing biographical info field

And I’ve got code looking like this:

in there.

(If you cut and paste this handy code, do remember to swap out my name and profile number for yours!)

If you’ve only the one author, you’re done. Otherwise, you repeat for each individual author.

You can test that you’ve got it all working fine by using the rich snippet testing tool.

If you have any problems getting this working, do let me know via the comments box, or ping me on twitter or even via g+ 😉

Filed Under: Blogging, Social media.

Getting into the g+ groove – google authorship and wordpress.com

6th February 2013 By Jax Blunt Leave a Comment

There’s a new social network in town, and it’s not going to go away in a hurry. If you’re getting ready to hangout on g+ (see what I did there?) one of the things you should be thinking about is claiming authorship. Don’t know what that is?

Quite simple. If you try checking out the search listings these days, you should see some articles come up with a fetching headshot of the author next to them.  Those authors have claimed authorship of that article via google. You can claim authorship across multiple sites, but for today I’m going to concentrate on wordpress.com blogs.

After some experimentation, it seems to me there are two major ways to claim authorship on your site. One is by displaying a badge on your site, which has its own difficulties, given that you can’t use javascript on wordpress.com and the nice tool Google has supplied only seems to build javascript.

Before we go any further, you do have a G+ profile don’t you? You’re going to need one. You can pop off and create one now if you like, I’ll wait.

Right, here’s how to build a nice badge that links to your G+ article. The google tool to do it is here. Even though it says it’s a static tool, it looks to me that it’s building javascript, so that’s not going to do wordpress.com authors any good at all. Fear not, I have a solution. This is the code I’m using on my wordpress.com site, Let’s raise the roof.

You will want to swap out the long number in the link for your own profile number – you don’t really want to be displaying my badge all over the place! But this code should give you a nice badge for your site. I’ve put it in a footer widget as I don’t have a sidebar, but wherever you can that displays it on every page really.

Then you need to go back to your google+ profile and make sure you’ve added the site to the contributing section.

You’ll want to test that it’s all working – google have handily supplied a rich snippet testing tool.

I also have an author tagged link in my about page although I’m not convinced this is completely necessary if you’ve got the badge all over the place. Do let me know if you find differently.

(Again, swap me out for you.)

If all that has worked, it’s probably time for a cup of tea. And maybe a biscuit. Sit back and congratulate yourself.

Now, I’ve every reason to think that this would work fine if your site is self hosted, but what if you don’t want to display a g+ profile badge on every page, or you want to show a page badge, or you have multiple authors? Don’t worry. The article that covers all of those is coming up tomorrow. Stay tuned. (Or even subscribe to the RSS feed so you never miss a thing.)

Filed Under: Blogging, Social media.

Ten minute tip – Jetpack extra sidebar widgets.

25th November 2012 By Jax Blunt 2 Comments

Yesterday I posted about adding sharing and following options to this blog, and the solution I settled on was Jetpack.

I’m not 100% happy with the sharing buttons. It appears that you can’t customise the tweet that goes out without hacking adjusting the code yourself, and while I’m perfectly capable of getting down and dirty with php, I really don’t want to have to. Also I’m not about to be going round recommending to my lovely readers that they do that – there are all sorts of problems inherent in wading into core files, not least that whatever you have working now, might not next time you upgrade. And that’s if you don’t do anything horrid to your install in the first place 😉

So, jury is out on the sharing options. But what I did need was a box in the sidebar that allowed people to subscribe, and in the mahoosive page of options within the jetpack configuration, there was one labelled extra sidebar widgets that promised just that.

So I clicked on that option,

Jetpack options - extra sidebar widgets

went into the page and added the widget.

Blog subscription options

I also discovered while wandering around the options, that I sent out an email yesterday with the greeting howdy at the top of it. I do apologise for that, Nickie. So, further hints and tips when you are using Jetpack to offer email subscription, go into Settings>Reading and customise the email that is sent out. Unless you’re happy saying Howdy to people. Maybe you are.

And as all of that still only took about 5 minutes, rather than the 10 I’m limiting these posts too, I went for broke and added a facebook page widget. As I’m currently the only person liking the page, it’s a bit embarrassing and I may take it off. Can’t quite decide whether I want the twitter feed there. Hm.

Thoughts?

I’d be really grateful if anyone who finds these posts useful would let me know with a quick tweet or a comment. And if you don’t find them useful but there’s something else I could be helping you with, let me know about that too.

Filed Under: Blogging, Social media. Tagged With: email subscriptions, Jetpack, Ten minute tip

  • Page 1
  • Page 2
  • Go to Next Page »

Copyright © 2025 · Genesis Sample On Genesis Framework · WordPress · Log in

  • Home
  • Visiting the blog doctor
  • Privacy and disclosure policies.