• Skip to primary navigation
  • Skip to main content

Technology Solved

Just another Junction30 Sites site

  • Blogging
  • Gadgets and gizmos
  • Social media.
  • Tweetable definitions.
  • FAQs

Blogging

More on G+ – authorship on self hosted wordpress including multi author sites.

7th February 2013 By Jax Blunt 4 Comments

Yesterday I wrote about how to claim authorship for your wordpress.com site. The technique I used included displaying a profile badge on your blog. You might not want to do that (perhaps you’d like to display a page badge instead, more on that in another article), or you may have more than one author on your site, like I have on Making it up, so need something a little different.

Don’t worry, this is still straightforward. There are plugins, such as Yoast, that will achieve this for you, or you may be able to do it with your theme, particularly if you’re using a premium theme like Genesis from Studio press, but it’s very simple to do it yourself. Basically, there are two steps.

Step 1 – each author needs to list your blog in the contributing section of their google profile.

So my profile looks like this:
g+ profile showing contributing sites 
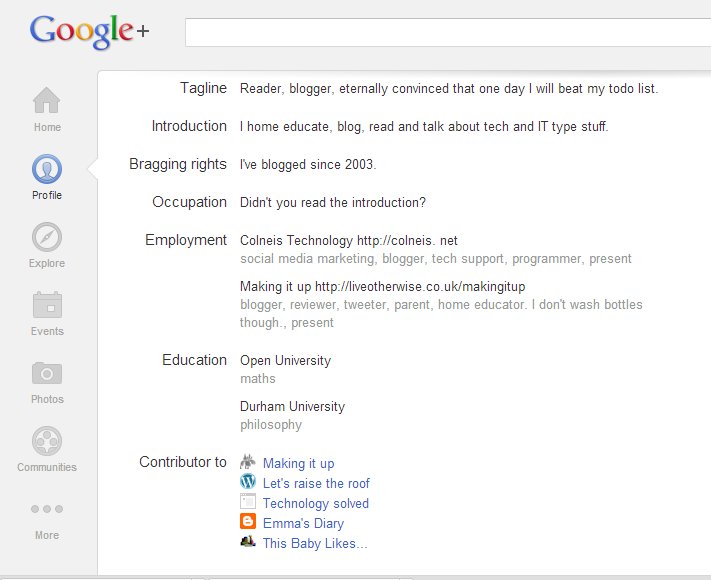
(as ever, click to embiggen).

Step 2.
In your wordpress admin, find users on the left hand side. Select, then select yourself. In the biographical info section, you’re going to put your g+ profile link with the rel=”author” tag. So mine looks like this:
wordpress user info showing biographical info field

And I’ve got code looking like this:

in there.

(If you cut and paste this handy code, do remember to swap out my name and profile number for yours!)

If you’ve only the one author, you’re done. Otherwise, you repeat for each individual author.

You can test that you’ve got it all working fine by using the rich snippet testing tool.

If you have any problems getting this working, do let me know via the comments box, or ping me on twitter or even via g+ 😉

Filed Under: Blogging, Social media.

Getting into the g+ groove – google authorship and wordpress.com

6th February 2013 By Jax Blunt Leave a Comment

There’s a new social network in town, and it’s not going to go away in a hurry. If you’re getting ready to hangout on g+ (see what I did there?) one of the things you should be thinking about is claiming authorship. Don’t know what that is?

Quite simple. If you try checking out the search listings these days, you should see some articles come up with a fetching headshot of the author next to them.  Those authors have claimed authorship of that article via google. You can claim authorship across multiple sites, but for today I’m going to concentrate on wordpress.com blogs.

After some experimentation, it seems to me there are two major ways to claim authorship on your site. One is by displaying a badge on your site, which has its own difficulties, given that you can’t use javascript on wordpress.com and the nice tool Google has supplied only seems to build javascript.

Before we go any further, you do have a G+ profile don’t you? You’re going to need one. You can pop off and create one now if you like, I’ll wait.

Right, here’s how to build a nice badge that links to your G+ article. The google tool to do it is here. Even though it says it’s a static tool, it looks to me that it’s building javascript, so that’s not going to do wordpress.com authors any good at all. Fear not, I have a solution. This is the code I’m using on my wordpress.com site, Let’s raise the roof.

You will want to swap out the long number in the link for your own profile number – you don’t really want to be displaying my badge all over the place! But this code should give you a nice badge for your site. I’ve put it in a footer widget as I don’t have a sidebar, but wherever you can that displays it on every page really.

Then you need to go back to your google+ profile and make sure you’ve added the site to the contributing section.

You’ll want to test that it’s all working – google have handily supplied a rich snippet testing tool.

I also have an author tagged link in my about page although I’m not convinced this is completely necessary if you’ve got the badge all over the place. Do let me know if you find differently.

(Again, swap me out for you.)

If all that has worked, it’s probably time for a cup of tea. And maybe a biscuit. Sit back and congratulate yourself.

Now, I’ve every reason to think that this would work fine if your site is self hosted, but what if you don’t want to display a g+ profile badge on every page, or you want to show a page badge, or you have multiple authors? Don’t worry. The article that covers all of those is coming up tomorrow. Stay tuned. (Or even subscribe to the RSS feed so you never miss a thing.)

Filed Under: Blogging, Social media.

Ten minute tip – Jetpack extra sidebar widgets.

25th November 2012 By Jax Blunt 2 Comments

Yesterday I posted about adding sharing and following options to this blog, and the solution I settled on was Jetpack.

I’m not 100% happy with the sharing buttons. It appears that you can’t customise the tweet that goes out without hacking adjusting the code yourself, and while I’m perfectly capable of getting down and dirty with php, I really don’t want to have to. Also I’m not about to be going round recommending to my lovely readers that they do that – there are all sorts of problems inherent in wading into core files, not least that whatever you have working now, might not next time you upgrade. And that’s if you don’t do anything horrid to your install in the first place 😉

So, jury is out on the sharing options. But what I did need was a box in the sidebar that allowed people to subscribe, and in the mahoosive page of options within the jetpack configuration, there was one labelled extra sidebar widgets that promised just that.

So I clicked on that option,

Jetpack options - extra sidebar widgets

went into the page and added the widget.

Blog subscription options

I also discovered while wandering around the options, that I sent out an email yesterday with the greeting howdy at the top of it. I do apologise for that, Nickie. So, further hints and tips when you are using Jetpack to offer email subscription, go into Settings>Reading and customise the email that is sent out. Unless you’re happy saying Howdy to people. Maybe you are.

And as all of that still only took about 5 minutes, rather than the 10 I’m limiting these posts too, I went for broke and added a facebook page widget. As I’m currently the only person liking the page, it’s a bit embarrassing and I may take it off. Can’t quite decide whether I want the twitter feed there. Hm.

Thoughts?

I’d be really grateful if anyone who finds these posts useful would let me know with a quick tweet or a comment. And if you don’t find them useful but there’s something else I could be helping you with, let me know about that too.

Filed Under: Blogging, Social media. Tagged With: email subscriptions, Jetpack, Ten minute tip

Ten minute tip – sharing and following.

17th November 2012 By Jax Blunt 7 Comments

As has been pointed out to me by a few people already, this blog didn’t have a follow by email option. RSS exists for wordpress, though I haven’t done anything to highlight how to subscribe, but the drawback of using plain RSS is that you don’t get any stats on who is following you.

There are, obviously, ways around this. The biggest and best known way is probably feedburner, which is now owned by google. The drawback to that is that google has deprecated the api, which is a technical way of saying that they aren’t developing it any more, may well cease to support it and eventually it just won’t work. Given that moving subscribers between services can be rather a pain, and the feedburner stats have been flakey to say the best, that means it’s no longer top of my recommendations list.

If you discuss this on twitter at any point, you will very quickly hear from one @phollows. He is the founder of FeedBlitz, a feedburner alternative. He has a tutorial on how you migrate from Feedburner to Feedblitz, and I suspect it’s a good alternative for businesses, but it may be just too pricey for bloggers as you are charged by email subscriber.

Another option is Mailchimp, which until you’ve got 2000 subscribers, is free. Free is a word I’m fond of. This isn’t a system I’ve tried though, so I’ve now run out of things to tell you about it 😉

When I asked on twitter for other suggestions, there was only one person who spoke up, Mummy Barrow. She uses subscribe2 from within wordpress – it’s a plugin. I took a look at it, and it’s what I would call option lite until you start paying, and as I’m trying to avoid paying, I’m moving on again.

Plugins within wordpress did look like a good option though, and so I started to investigate Jetpack. As I mentioned previously, it’s now possible to migrate at least some of your followers from wordpress.com to a self hosted wordpress blog if you’re using Jetpack, so that looks like a good starting position. It does far more than manage email subscription, but as this is a ten minute post, I won’t explore more than following and sharing at this point. Configuring the following options for email was as simple as ticking a couple of tickboxes in a settings page, and I now offer email subscriptions.

I had installed Addthis to manage my sharing buttons, but somewhere between me using them on my personal blog and setting them up on here, the layout appears to have gone seriously askew. So I am uninstalling them, and will explore the Jetpack features for sharing as well.

Configuring the Jetpack sharing buttons is just a case of dragging the buttons you want to display into a box. It doesn’t look like I can configure the tweet that will be sent out, but I may be missing something – I’m running out of my ten minutes though, so I’ll come back to that later.

The blog is now set up to be followed and shared – I hope that you’ll do both 🙂

Filed Under: Blogging, Social media.

Ten minute tip – Back up your blog.

13th November 2012 By Jax Blunt 1 Comment

You know it makes sense. You’ve put your heart and soul into that writing, you do not want to lose it.

So the first in my ten minute tip series is Back up your Blog.

As WordPress is my platform of choice, we’ll go through that first. If you’re self hosted, there are actually a variety of back up techniques, but the first one I’m going to cover is the simplest, and applies to wordpress.com as well. Go into your dashboard, scroll down to tools, find export. This will download a file containing all your posts, comments, categories and so on, and if necessary you can import it into a whole new wordpress blog.

It looks something like this. (Click to see larger.)

There are other back up techniques, particularly if you’re self hosted, but this one is quick and easy to get your content out and you’ll have content such as posts, pages and comments but not template/widgets and any CSS customisations. As you can install themes separately, the widgets are the only thing that you might have to redo manually in the event of an unscheduled move. Your images don’t come down in the export file, while they are pulled across during an import *if* the previous blog is still available, if you want a separate backup you need to manually download.

Get into a habit of doing a backup regularly – make an appointment with yourself weekly in your google calendar and set a reminder.

If you’re on blogger, basically you’ve got the same ability , you’re looking again under tools for an export blog section. You can find a detailed tutorial over at Geekalicious – Back up your blogger blog.

If you are self hosted you can use ftp to copy all the files that make up your blog, though you will still have to export the data separately. I’ll be doing a separate post on that very soon.

Another way of making sure you have your content regularly is to set up an email subscription and subscribe to it. Similarly you can get your comments emailed to you from most systems.

If I’ve missed anything out or you have questions, feel free to ping me on twitter @liveotherwise, or leave me a comment here.


Filed Under: Blogging Tagged With: backup your blog, Ten minute tips

That cookie law.

22nd May 2012 By Jax Blunt Leave a Comment

At the end of this month, May 2012, an awful lot of website owners (including bloggers) are about to find themselves breaking the law. It’s not even a new law – it was passed last year, but with a year’s grace so we could all prepare. Instead most people haven’t even heard of it, let alone done anything to comply.

It’s this: Privacy and Electronic Communications (EC Directive) (Amendment) Regulations 2011 (UK Regulations) which provides that certain information must be given to a site’s visitors and they must give informed consent to the placing of the cookies.

Right about now it’s entirely possible various of you are wondering what a website has to do with biscuits. A cookie in this case is a text file, downloaded via the browser, and stored on your computer. It’s the sort of thing that allows Amazon to suggest products dependent on what you’ve viewed before, that means Google can personalize your search results, and lets shopping carts actually function.

So what does the law mean, and how do you comply? You might think if you aren’t selling anything you aren’t setting cookies. But if you’re using google analytics, social buttons or anything of that sort the odds are you are. The first thing to do is run an audit – there are a number of ways to do this. In firefox you can install the web developer extension, then right click in a page and look for web developer>cookies. When you’ve worked out what they all are, decide which of those cookies you want to keep – get rid of the rest of them, your website will probably thank you. (Further instructions coming on how to make all this make sense as I work through it myself.)

You also need to write up a privacy policy that explains what cookies you are using and what for – cookies that are essential for your website to function are exempted, but probably worth putting them in your policy anyway. Here’s one I’m working on for my main blog: liveotherwise privacy policy.

Then you need to decide what disclosure method you prefer. You can go for a popup on first page that also prevents cookies from being set until the user agrees. Or you can disclose in a header or footer message – the jury has not yet been convened as to which of these methods will be deemed sufficient, but we’re going with popups. (No, you won’t see it on here today, I haven’t finished working on it. It’s on liveotherwise though.)

Don’t think that just because you’re a little website you’ll get away with it. The ICO doesn’t have a lot of money to prosecute people – my best guess is that they will go after the small fry first, not the big companies who can just throw lawyers at the problem. Get your house in order, and if you can’t do it yourself, call on your local geek – I recommend this chap at colneis technology. 😉

Tweet
//

Filed Under: Blogging, Social media.

  • « Go to Previous Page
  • Page 1
  • Page 2
  • Page 3
  • Go to Next Page »

Copyright © 2025 · Genesis Sample On Genesis Framework · WordPress · Log in

  • Home
  • Visiting the blog doctor
  • Privacy and disclosure policies.